Monday, September 23, 2013

Fall Newsletter!

So sorry this is so late! It's been a pretty crazy month, so we are doing a September/October combined fall newsletter. Fall is absolutely my favorite time of the year and I'm so excited to share our news with you!
September 24th: 6-10 year old Children’s Art Class! $7.50 per class per child, $6.00 per child if you have more than one child in your family taking classes, all materials provided. 4:30-5:30pm (last Tuesday of every month except on holidays)
September 26th: 4-5 year old Children’s Art Class! $7.50 per class per child, $6.00 per child if you have more than one child in your family taking classes, all materials provided. 4:30-5:30pm (last Thursday of every month except on holidays)
October 19th: Creative Gift Box Class! Papers, glue, embellishments, and bone folder included, $15.00. 2:00-4:00pm

October 24th: 4-5 year old Children’s Art Class! $7.50 per class per child, $6.00 per child if you have more than one child in your family taking classes, all materials provided. 4:30-5:30pm (moved to the 24th because of Halloween)
October 29th: 6-10 year old Children’s Art Class! $7.50 per class per child, $6.00 per child if you have more than one child in your family taking classes, all materials provided. 4:30-5:30pm (last Tuesday of every month except on holidays)
Our DIY this month is a fun burlap flower. It's a great fall decoration that can be added to just about anything: a burlap wreath, fall garland, table centerpiece, etc. 
First I cut a 6 foot long by 2 inch wide strip of burlap. Then I threaded a large darning needle with package string and knotted it 2 or 3 times on the end. I did a basting stitch across the bottom of the strip. When I got all the way to the end, I pulled the string, gathering it into a ruffle. I didn't gather mine supper tight. I tied knots in that end of the string. Then I cut a circle out of burlap that was about 4 inches wide, curled the ruffle into a spiral, and glued it down onto the circle with fabric glue. I pulled off any excess strings of burlap sticking out.  My flower is about 6.5-7 inches wide. If you would like a smaller flower, simply cut a thinner strip of burlap. 
We hope you are having a fabulous fall, enjoying the gorgeous weather and fall activities!

Saturday, September 7, 2013

I've been taking photos for as long as I can remember. Sometimes they suck, sometimes I get lucky. So I have all these photos that I've been storing up that haven't really been serving any purpose. Some of them I really love and I felt like it was a waste. So, I decided to open another Etsy shop. Just photography on this one. I'm hoping that someone else will love them too, and will want a nice big print on their wall to make them happy every time that they look at it.
Check out it here: http://www.etsy.com/shop/LaceyLynPhotography
Here are a couple of sneak peeks.


Saturday, August 24, 2013

My home

So a few different people have been asking me what my house looks like. I think they see all the funky stuff in the shop and think what in the world does her house look like? So here is a post with some pics of the interior of our house.

One of my favorite paintings ever, by Nancy Griffin. I'm lucky enough to have a husband that will occasionally splurge on artwork for my birthday :)
 And this beautiful door knob coat hanger was of course made by my talented mom, one of her first.
And she and I built this built-in bookcase. Yes, we already have way too many books for it. I'm trying to convince myself to get rid of some of them.
Papaya wall hanging :)
The scroll painting on the wall was a going away gift from some of our students in China.


Paris photos by Jessica Smit, a great friend and talented artist. Check out her paintings here.

We've done a lot of work on the house, but there are definitely things that still need updated, hopefully we will eventually get to them. I probably would have gone slightly more muted with some of the colors, but I have a husband that likes very bright colors, so they were a compromise. I picked the two very neutral colors out myself and they are maybe a little too boring so its probably good we have to compromise. :) And I think its obvious that the year we lived in China has definitely influenced our style, although I've always had an affinity for Asian things so maybe not. Also, as far as store items go, I have kept back a few of our auction finds that I just loved: a wood mid-century modern chair that now sits at Cory's synth (which doesn't appear in any of the photos), a cool old phone chair, and there is a floor lamp I'm considering that we haven't found a shade to fit yet. We also bought a very cool mid-century upholstered chair from Sandhills Sage to replace a chair in the living room that was in terrible shape. The basement still looks like a basement and the two tiny upstairs bedrooms still need a lot of work. Anyway, this is our house so far...


Wednesday, August 14, 2013

August Newsletter!

It's August! Summer is winding down and its time to get back into the swing of school and activities. We have some fun ones for you to get back into the swing with!
August 22nd: Paper Cone Wall Flower Class! Learn how to make a decorative paper flower wall hanging out of book pages. All materials provided, 6:00-9:00pm. $30.00
August 27th: 6-10 year old Children’s Art Class! $7.50 per class per child, $6.00 per child if you have more than one child in your family taking classes, all materials provided. 4:30-5:30pm (last Tuesday of every month except on holidays)
August 29th: 4-5 year old Children’s Art Class! $7.50 per class per child, $6.00 per child if you have more than one child in your family taking classes, all materials provided. 4:30-5:30pm (last Thursday of every month except on holidays)
Our DIY this month is a fun take on a photo collage/page layout. We are loving all the fun geometric designs we've been seeing lately and decided to use a hexagon shape for our photo collage.
It's pretty simple. We found this free hexagon template online here. We cut out the 3 inch hexagon and simply held it in place over our photos and paper and cut them out (trace it first if you prefer). Choose coordinating colors for your hexagons or use all photos and create a pattern on your paper. It's a bit like putting a puzzle together. We used colored cardstock, book pages, and photos for our hexagons and we chose gold glitter paper for our background to gussy it up a little. Next, just glue them in place. If it's for a scrapbook, you can add a tittle and maybe use a hexagon for journal info. Otherwise to hang as a photo collage, slip it into a frame or glue it onto chipboard, punch holes at the top, and string a ribbon through. A great way to display some of your fun summer photos :)
We hope that you have an awesome August full of summer memories and fresh starts.


Saturday, August 10, 2013

We're going to the fair...

And we might even see some senoritas with flowers in their hair, 'cause we have some cute ones for sale in our booth. :) It's been a busy two days out at the fair and we've had a lot of fun. Thought I would share some photos. Also, I want to mention that I loved seeing so many of my art students' work in the fair - I'm so proud of you all, you are awesome!
Here is our booth:

Lots of new fun stuff, plus coupons and drawings. And guess who's next door?

Chelsie Moreland Photography with four big photos featured from our styled shoot!
There is one day left and we'd love to see you there! Tomorrow's hours for the Trade Show Pavillion are 12-4 :)

Thursday, July 25, 2013

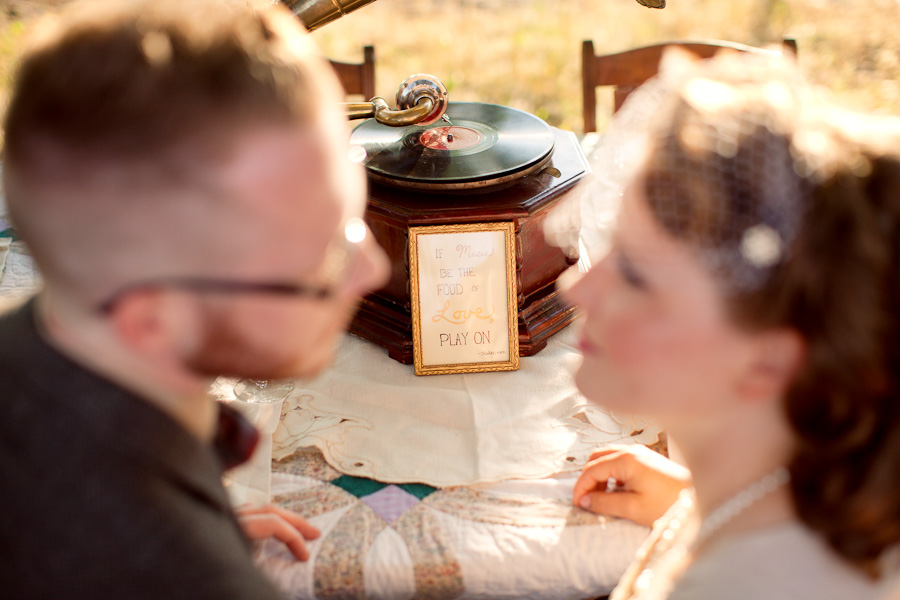
If music be the food of love, play on...


So this amazing photographer asked me to do a styled wedding shoot with her. I'm so honored to have been a part of this! So much fun planning and making everything, I mean, who doesn't love getting to plan another wedding!
I absolutely adore how natural Chelsie's photography is, the gorgeous natural lighting and unposed look of her subjects, it's just stunning! Check out her website here: Chelsie Moreland Photography. So psyched to have been part of this (did I mention that already :-))!
And I have to give credit to the rest of the people who helped to make this happen: We had a great make-up artist, Lacy Covey. My aunt and uncle let us use their beautiful land. Chelsie's husband let us use the horse trailer, Marxophone, and even their dining room table! And we had incredible models. Which I need to brag on a little more. Seriously, the models (my friends Andy and Kerri), were amazing. They worked in terrible conditions: heat,wind, bugs, no food for hours, and were incredibly helpful and patient. Andy let us borrow his beautiful phonograph and Kerri found her own dress and shoes to wear and they really made the shoot work. I mean, look how adorable they are:
Photo by Chelsie Moreland Photography
So, now for the rest of the photos, which Chelsie has graciously lent me. Please only copy and repost with her permission. I seriously want to post all of them, but I will try to narrow it down.
Tablescape
Photo by Chelsie Moreland Photography
So I was going for a kind of old world music feel, with a little rustic Nebraska countryside thrown in of course :-).

Bouquet and Bout
Photos by Chelsie Moreland Photography

Photos by Chelsie Moreland Photography
I had lots of fun with vintage music sheets :-)

Birdcage Veil
Photo by Chelsie Moreland Photography
Table Numbers, to find where you sit
Photo by Chelsie Moreland Photography
Setting the Mood
Photos by Chelsie Moreland Photography
Let's Eat
Photo by Chelsie Moreland Photography
Fanfold pinwheel placecards and little bottles of homemade syrup for favors, 'cause guess what's for dessert?

Dessert
Photo by Chelsie Moreland Photography
Waffles with fresh berries (and cake of course).
Photo by Chelsie Moreland Photography

Photo by Chelsie Moreland Photography
And yes, that giant flower on the wall is what our August Class is on (but the ones we make in class will be slightly smaller, that one is seriously 3 feet in diameter).
And a few more pretty pics to leave you with
Photo by Chelsie Moreland Photography


Check out our Etsy shop to purchase some of the handmade items shown here, or contact us for custom orders by visiting cherryblossompaper.com


Saturday, July 13, 2013

July Newsletter!

It's hotter than a pepper sprout out there, and we have some hot news for you!
July 18th, 25th, and 30th: 4-5 year old Children’s Art Class! $7.50 per class per child, $6.00 per child if you have more than one child in your family taking classes, all materials provided. 4:30-5:30pm 
August 3rd: Crazy Day! Come check out our great sales and free face painting from 10:00am-1:00pm!
August 9-11th: Come visit us out at the Big Tent at the fair: prizes and more!
August 22nd: Paper Cone Flower/Wreath Class! Learn how to make a decorative paper flower wall hanging out of book pages. All materials provided, 6:00-9:00pm. $30.00

August 27th: 6-10 year old Children’s Art Class! $7.50 per class per child, $6.00 per child if you have more than one child in your family taking classes, all materials provided. 4:30-5:30pm (last Tuesday of every month except on holidays)
August 29th: 4-5 year old Children’s Art Class! $7.50 per class per child, $6.00 per child if you have more than one child in your family taking classes, all materials provided. 4:30-5:30pm (last Thursday of every month except on holidays)

Make Your Own Drink Umbrellas

Our DIY this month is great for those outdoor summer parties. Not only do they look adorable, but if you use them on a straw and slide them down to the top of your cup, they will also help keep the bugs out of your drink. And they're extremely simple to make. I traced around the bottom of a solo cup and cut out the circle with decorative scissors. 
Then I cut a line in to the center of the circle (if you want this exact, you will have to use a compass instead of a cup :-)). Cut another line into the center, cutting a triangle out of your circle. The wider your triangle, the more "tented" your umbrella will be.
Next punch a hole in the center of your circle and overlap the edges of your triangle, gluing the paper together.
Your punched hole will probably be smaller than your straw. This works well because when you force the straw through, your umbrella will fit tightly on the straw and stay in place.
Enjoy!

