Saturday, December 6, 2014

Jewelry Displays / Organizers

We make a little bit of jewelry and we take it on consignment from a couple of people, the majority of it coming from the talented Lizzie Heinert. Anyway, we have a large selection and so we've had to come up with some creative displays that I thought I'd share.
Necklace lampshade
Book ring holder
Vintage drawer on lazy susan
Mom actually made this cute chair shelf to hold hand and tea towels, but it works for jewelry too :)
Crib rail
Frame hair clip and necklace holder
Altered vintage suitcase
Vintage wrought iron hanger, actually originally for necklaces?
Lizzie made this cool fork hanger
Drawer with key hooks

Tuesday, December 2, 2014

December Newsletter!

Happy December! It's that crazy time of year again! I've started adding crushed candy canes to my morning coffee :)

Extended Holiday Hours: Open Sundays from 1-5pm, open until 8:00pm on the 20th, 22nd, and 23rd.

December 29th: 6-10 year old Children’s Art Class! $7.50 per class per child, $6.00 per child if you have more than one child in your family taking classes, all materials provided. 4:30-5:30pm 
December 30th: 4-5 year old Children’s Art Class! $7.50 per class per child, $6.00 per child if you have more than one child in your family taking classes, all materials provided. 4:30-5:30pm (last Tuesday instead of Thursday because of Christmas)


Instead of our regular DIY, this month we have free printable holiday party invites. A big thanks to the Friends of the Library for inviting me to speak at their "Entertaining for the Holidays" Event. These are the three holiday themes I presented on, and the free printable invites, as promised :). 
The first theme is a super simple way to make your table setting and invites festive and fun. Simply use washi tape.
To create this invite, just print out the invite on 5x7 white cardstock, stick washi tape pieces on the bottom and draw flames on the top of them for candles. To view and print, click HERE. (to print 5x7, open your print dialog box, click on page setup, and change the size from 8.5x11 to 5x7)
The second theme is a more traditional and elegant Christmas tree theme.
 
To create this invite, print out the invite on 5x7 white cardstock. Also, print out the Christmas tree pattern. Then cut it out and use the pattern to cut the invite into a Christmas tree shape. To view and print the invite, click HERE.
The last theme is a rustic natural theme.
To create this invite, print it out on 5x7 cream cardstock. Then cut 1/4 inch off of all sides. Cut a 5x7 rectangle from brown paper and glue the invite onto the brown paper, centering it. To view and print, click HERE.
We hope you have a wonderful holiday season full of peace, love, and joy!

Thursday, November 13, 2014

Cotton Bouts

This sweet North Carolina bride sent me photos of her beautiful wedding that I made the boutonnieres for via an Etsy order. So nice to see what they actually look like in the wedding!
Akins Photography
Akins Photography
Akins Photography
Vintage music sheet leaves, guinea feathers, cotton bolls, vintage buttons, and vintage seam binding ribbon.
Akins Photography
Akins Photography
Akins Photography
Such a beautiful wedding!
Akins Photography
All photography by Akins Photography, to see more pictures of this beautiful wedding visit their site here: akinsphtography

Monday, November 10, 2014

Vintage Christmas

Christmas scenes in vintage jar and ornament box
Vintage deer in covered cigar boxes, covered suitcase, and ornaments
Vintage ornament frame display
Church attendance board turned advent calendar with vintage decorations
Vintage honeycomb snowmen turned into garland and vintage ornaments on tree
Vintage silver trees and some vintage ornaments on chalkboard advent calendar

Friday, November 7, 2014

November Newsletter!

It's starting to get a little chilly out there, but that means hot cider and cocoa, glowing fireplaces, and holiday time with friends and family is on it's way! So excited to share our November news with you.
November 22nd: Friends of the Library is hosting a free event, "Entertaining For The Holidays" at the library. I will be doing a presentation at 10:00am and am getting super excited about the ideas/demos I'm going to share!
November 23rd: Holiday Preview starting at 1:00pm!
November 20th: 4-5 year old Children’s Art Class! $7.50 per class per child, $6.00 per child if you have more than one child in your family taking classes, all materials provided. 4:30-5:30pm (a week early due to Thanksgiving)
November 24th: 6-10 year old Children’s Art Class! $7.50 per class per child, $6.00 per child if you have more than one child in your family taking classes, all materials provided. 4:30-5:30pm 

We have a fun Thanksgiving holiday DIY for you this month.
Turkey place cards and pumpkin favor bags. To make the turkeys, cut a 2 and 1/2 x 12 inch strip of decorative cardstock in a fun fall color. Fan-fold the paper back and forth. I made my folds about 3/8 to 1/2 inch wide.
Next, cut a 1/2 inch wide by about 5 inches long strip of cardstock and glue it to the bottom side of your last fold.
Glue the other side of your accordion to the rest of your strip, putting a little extra glue in the middle.
Then cut or punch out two circles. One 1 inch and the other 2 inches in diameter.
Chop off the bottom of the larger circle and glue the smaller circle to the top of it for the head and body of the turkey.
Poke some brads through the head for eyes, using a marker to make pupils on them. Then cut out a tiny yellow triangle for the beak.
Glue the beaks on. Then cut out a 1 x 2 inch cardstock rectangle for your names to be written on. Glue that behind your turkey's head, or poke one of his brad eyes through it to hold it in place and write a guest's name on the rectangle. Finally, glue the turkey body onto your fan-fold tail feathers. 
The pumpkin favor bag is pretty self-explanatory. Just fill a small brown paper bag with goodies, tying it tight about halfway down. I used a die cut to cut out a leaf, but you could draw a simple leaf to cut out or use a tag also. I tied the leaf on with brown manilla twine. Then twist the top of your bag to make the stem.
Hope you have a wonderful month! We are so thankful for all of our wonderful customers and supporters, you inspire us!

Wednesday, October 1, 2014

Mint & Gold Wedding

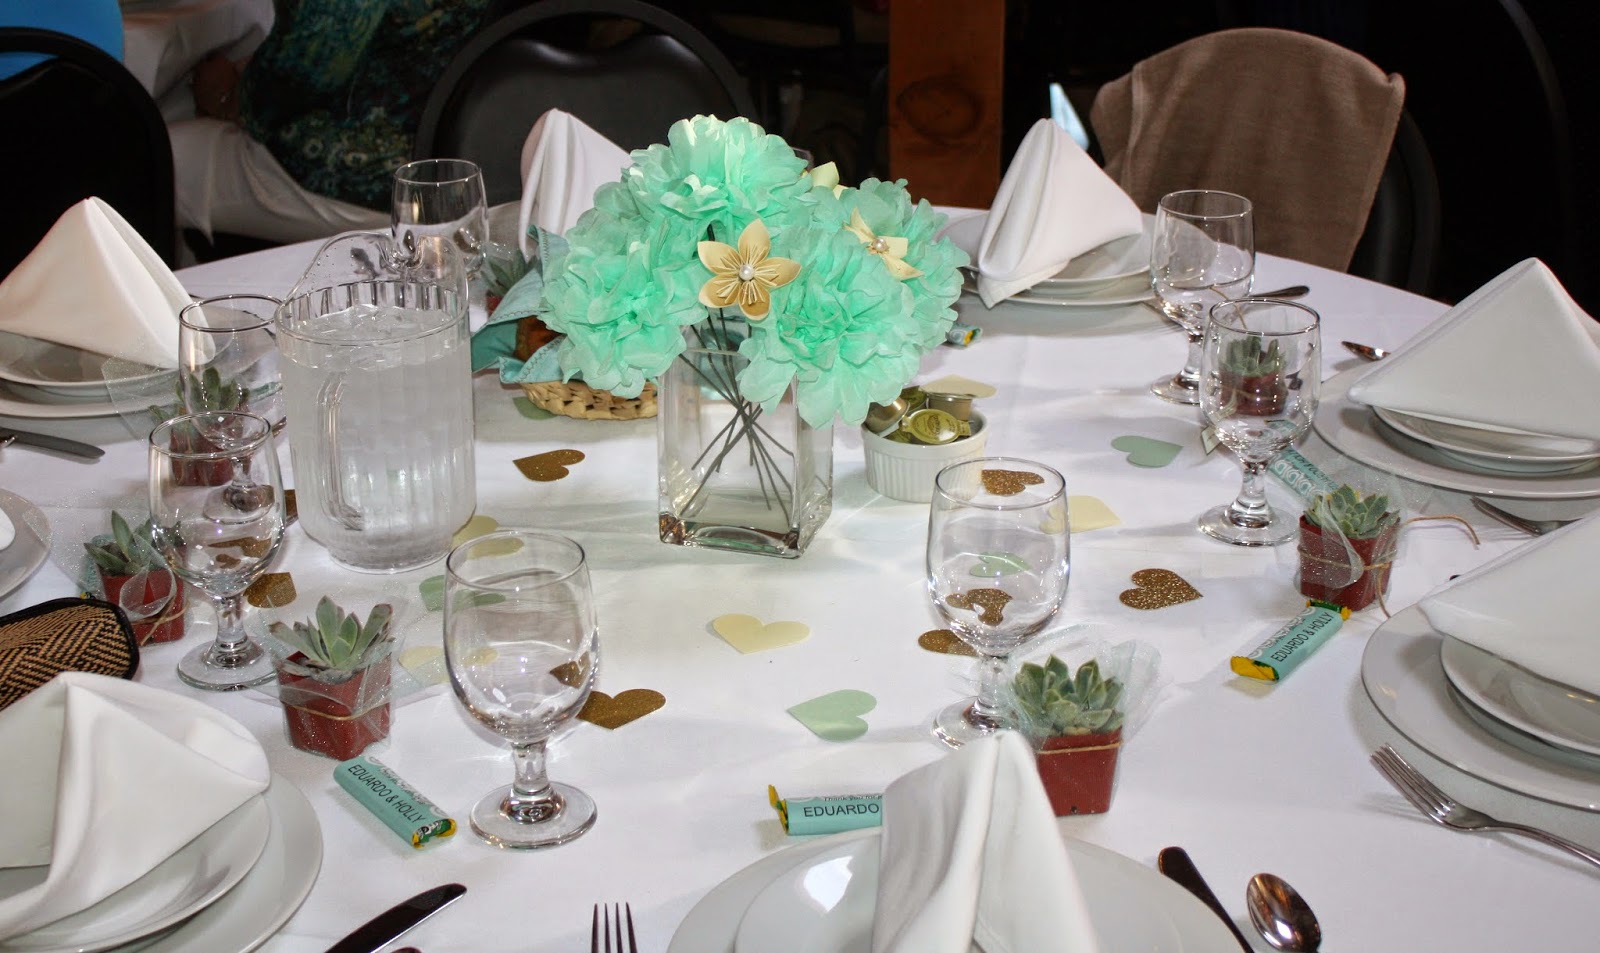
So, so privileged to make the decorations for Eduardo and Holly's wedding. They have great taste! :) 
Photo by Zane Mulligan Photography
The bouts for the groom, dads, and groomsmen were cream paper leaves, 3 small mint roses, and 3 ivory daisies with gold pearl centers.
bridesmaid bouquets by Cherry Blossom Paperie, photography by Zane Mulligan
Photo by Zane Mulligan Photography
The bridesmaid bouquets were large cream curled petal roses, small mint roses (larger version of the ones in the boutonnieres), and gold glitter leaves.
Photo by Zane Mulligan Photography
Sweet photo of Holly's family, but I'm posting it for the mother's corsage :). The mothers' corsages were a cream folded edge rose, small gold glitter leaves, baby's breath, ivory daisies with gold pearl centers, and mint serrated edge leaves.
Photo by Zane Mulligan Photography
They chose a simple and elegant venue for the ceremony. There were mint tissue and cream origami flower bouquets at the ends of the rows and a simple gold glitter heart garland across the white heart-shaped arch. 
And yes, we made over 180 wands with ribbons and bells on them for the send off. :)
Cream, gold, and mint hearts surrounded the mint tissue flowers and cream origami flowers with pearl centers that were the centerpieces for the reception tables.
Mint and gold hearts on strings and a gold glitter Mr & Mrs banner for the head table, along with the bridesmaid bouquets. We punched out over 480 hearts by hand for the string garlands and hearts on the tables, but it was totally worth it!
So I think a toddler must have come along and ripped off the "T", but this is the only pic I have of the sweets and treats banner so I'm posting it anyway :). 
Photo by Zane Mulligan Photography
Um, so obviously I didn't make the cake, but I love the way the photographer framed the photo with the tissue poms hanging above. There was a group of mint, cream, and white tissue poms over the cake table and one over the sweets and treats table.
By the way, the first 5 beautiful photos and this last photo were taken by Zane Mulligan. He took some gorgeous shots of them at the falls too, so if you want to see more of this wedding and his beautiful photography, check out his website here
Well, I think that's a wrap folks. Thanks for viewing my work, and thank you so much to Mr. and Mrs. Sanchez Perry and their families for choosing me and putting up with me when I was anal about where things should go! Such a beautiful wedding and such a beautiful couple!

Friday, September 19, 2014

September Newsletter!

Crazy month so far, but we are finally getting caught up! So thankful for all the wonderful brides and grooms that have chosen us to create pieces for their special day, and our first time at the Willow Tree Festival was amazing! Here is what's coming up:
September 23rd: Tiny Message Box/Diorama Class! Have fun creating tiny scenes and messages in boxes. Great for favors, Christmas decorations and advent calendars, and they are great way to brighten someone's day! All materials provided (including a bottle of my favorite PVA glue :)), $20. 6-9pm.
September 25th: 4-5 year old Children’s Art Class! $7.50 per class per child, $6.00 per child if you have more than one child in your family taking classes, all materials provided. 4:30-5:30pm 
September 29th:6-10 year old Children’s Art Class! $7.50 per class per child, $6.00 per child if you have more than one child in your family taking classes, all materials provided. 4:30-5:30pm 
October 25th: MPCC Party Decoration Class! Learn how to make tissue poms, fan-fold pinwheels, buntings, and more! Materials provided. 10:00am-12:00pm. Please contact Mid-Plains Community College Valentine Campus to sign up. 402-376-8033 
Please let us know as soon as possible if you are planning on taking an adult class, so that we know how many supplies to order in.
Our DIY this month is perfect for a fun fall decoration. Just find the cheapest and ugliest fake pumpkins you can. And check for sales, because even ugly pumpkins can be expensive.
You will need an old brush, a saucer, some glue, some old books you don't want any more, glitter (optional) and a pumpkin. Pour some glue in a saucer. Begin ripping up pages from your books, even more appropriate if they have a scary theme :). Brush glue (I used PVA bookbinding glue) on the back of your book page strip and glue down around your pumpkin. 
Continue gluing strips until your pumpkin is covered. Let your pumpkin dry for at least 1/2 hour. Next, coat the outside with a good quality decoupage medium (I used PPA).
Let that dry and coat one more time. Finally, spray it with a varnish sealer. I covered the ugly stem with glitter to coordinate with the glitter covered pumpkin I made, which is essentially the same process, just much messier :). Happy Fall!


Monday, September 8, 2014

We were so privileged that this amazing couple asked us to do all the decorations and flowers for their wedding.
I'm planning on doing a full post on the wedding and decorations when we get photos from the photographer, but for now couldn't resist a teaser :).

We are so thankful to the bridal party and family for helping set up and tear down everything, and of course to the bride and groom for choosing us to help make their day special! Congrats Eduardo and Holly! xoxo