Showing posts with label November. Show all posts

Friday, November 7, 2014

November Newsletter!

It's starting to get a little chilly out there, but that means hot cider and cocoa, glowing fireplaces, and holiday time with friends and family is on it's way! So excited to share our November news with you.
November 22nd: Friends of the Library is hosting a free event, "Entertaining For The Holidays" at the library. I will be doing a presentation at 10:00am and am getting super excited about the ideas/demos I'm going to share!
November 23rd: Holiday Preview starting at 1:00pm!
November 20th: 4-5 year old Children’s Art Class! $7.50 per class per child, $6.00 per child if you have more than one child in your family taking classes, all materials provided. 4:30-5:30pm (a week early due to Thanksgiving)
November 24th: 6-10 year old Children’s Art Class! $7.50 per class per child, $6.00 per child if you have more than one child in your family taking classes, all materials provided. 4:30-5:30pm 

We have a fun Thanksgiving holiday DIY for you this month.
Turkey place cards and pumpkin favor bags. To make the turkeys, cut a 2 and 1/2 x 12 inch strip of decorative cardstock in a fun fall color. Fan-fold the paper back and forth. I made my folds about 3/8 to 1/2 inch wide.
Next, cut a 1/2 inch wide by about 5 inches long strip of cardstock and glue it to the bottom side of your last fold.
Glue the other side of your accordion to the rest of your strip, putting a little extra glue in the middle.
Then cut or punch out two circles. One 1 inch and the other 2 inches in diameter.
Chop off the bottom of the larger circle and glue the smaller circle to the top of it for the head and body of the turkey.
Poke some brads through the head for eyes, using a marker to make pupils on them. Then cut out a tiny yellow triangle for the beak.
Glue the beaks on. Then cut out a 1 x 2 inch cardstock rectangle for your names to be written on. Glue that behind your turkey's head, or poke one of his brad eyes through it to hold it in place and write a guest's name on the rectangle. Finally, glue the turkey body onto your fan-fold tail feathers. 
The pumpkin favor bag is pretty self-explanatory. Just fill a small brown paper bag with goodies, tying it tight about halfway down. I used a die cut to cut out a leaf, but you could draw a simple leaf to cut out or use a tag also. I tied the leaf on with brown manilla twine. Then twist the top of your bag to make the stem.
Hope you have a wonderful month! We are so thankful for all of our wonderful customers and supporters, you inspire us!

Tuesday, November 12, 2013

November Newsletter!

It's November!!! So much fun getting ready for the holiday season and we are so thankful. Thankful for all of you. Seriously. If you have signed up for our newsletter, it means that you are interested in our shop, our classes, and/or our ideas and that is what brightens our day and keeps us going. We are so thankful for you! And we have lots of fun things in store for you this month!
November 17th: Holiday Preview from 1-5pm! Goodies and hot drinks, special deals, and holiday fun!
November 21st: 4-5 year old Children’s Art Class! $7.50 per class per child, $6.00 per child if you have more than one child in your family taking classes, all materials provided. 4:30-5:30pm (last Thursday of every month except on holidays)
November 26th: 6-10 year old Children’s Art Class! $7.50 per class per child, $6.00 per child if you have more than one child in your family taking classes, all materials provided. 4:30-5:30pm (last Tuesday of every month except on holidays)
December 5th: Christmas Mason Jar Diorama Class! Create a beautiful winter/Christmas scene in a mason jar as a diorama decoration or a snow globe. All materials provided plus extra supplies to take home, $25.00 per person. 6-9pm. Please prepay by November 27th. 

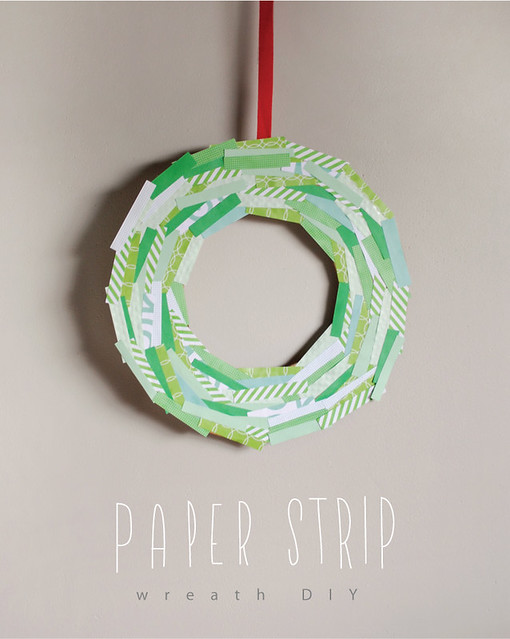
Our DIY this month comes from MerMag blog. It's such a cute and simple paper craft!
Click here to visit Merrilee's blog for instructions and to see cute variations of this paper wreath.
We hope your November is full of food, family, and fun! 


Saturday, October 27, 2012

Tags!

We are getting excited about the Tag Party on November 10th! So many possibilities! Here are a few:

Tag Mini Treat Bags

Steampunk Tags

Burlap and Glitter Gift Tags

Burlap Naturey Tags

Crafty Christmas Tags

Modern & Bright Christmas Tags


Tuesday, November 8, 2011

November Newsletter!

Cherry Blossom Paperie’s November Newsletter!
Thanksgiving is approaching and it reminds me of the many things I’m thankful for. Thankful that the fall weather has lasted this long and thankful for you, such encouraging and inspiring customers! Lots going on this month including the Holiday Preview on November 20th. Although, if you’ve been in the store lately, you know that our holiday preview has already begun! 
November 11th: Vintage Christmas Cards Class! Various techniques, vintage and vintage-inspired supplies provided! $15.00, 7:00-9:00pm
November 19th: Demonstration on making paper ornaments at the library.
November 20th: Holiday Preview from 1:00-5:00pm
November 29th: 4-5 year old Children’s Art Class! $7.50, all materials provided. 4:30-5:30pm. (Last Thursday of every month, except it’s Tuesday this month because the last Thursday is ThanksgivingJ).
November 30th: 6-8 year old Children’s Art Class! $7.50, all materials provided. 4:30-5:30pm. Last Wednesday of every month.
                *We will be open until 8:00pm on the first four Thursdays of December.
Our DIY project this month is the paper tree cutouts featured in our front window. If you are too busy this holiday season to make your own, we also have some for sale in the shop. If you don't subscribe to our newsletter, email lacey@cherryblossompaper.com for the pattern. Cut out the shape (for larger ones enlarge at 125% on a copy machine). Fold sheets of cardstock (available in our store) in half lengthwise. Trace one tree shape onto each sheet of cardstock, aligning the fold line of the pattern with the folded edge of the cardstock. On an appropriate cutting surface, use a craft knife or very sharp small scissors to cut through both cardstock layers on the traced lines. Open up the tree shapes (at least 2) and layer one over the other. Sew the trees together down the center fold with thread and a needle or a sewing machine. Position the tree halves at right angles to each other to stand the trees upright.
 
<